
Host n8n on the Google Cloud Free Tier with Docker

n8n on a free Google Cloud VM, on your own domain with HTTPS
You can run n8n around the clock on Google Cloud's free e2-micro VM: n8n in Docker, Nginx in front of it and a free Let's Encrypt certificate, so your workflows keep running when your laptop is closed. The VM and its disk sit inside the Free Tier; the public IP address is billed at about $3.65 a month on Google's current price list, plus a domain. The video does it in under 11 minutes.
The order is the one the video follows: create the VM, install Docker, point a subdomain at the server, start n8n, put Nginx in front of it and let Certbot add HTTPS. Every command below was checked against the official docs in October 2026, and several changed since the first version of this guide in 2025:
- n8n keeps its data in
/home/node/.n8n, not/root/.n8n. The old mount saved nothing to the VM's disk, so read the rescue section before you update an older install. WEBHOOK_TUNNEL_URLwas removed in n8n 1.0, andWEBHOOK_URLis nowN8N_WEBHOOK_URL.- The
N8N_BASIC_AUTHvariables went in n8n 1.0 too. n8n asks you to create an owner account instead. - Docker comes from Docker's own repository and Certbot from its snap, the way both projects document it today.
- Port 5678 is published on the VM's localhost only, so n8n is reachable through Nginx and HTTPS and nowhere else.
One honest warning before you start. n8n's own hosting docs say self hosting needs real server skills and point anyone who is not comfortable managing a server to n8n Cloud. If you are still choosing between tools, our overview of AI automation tools for business operations compares the options, and the rest of the n8n guides on this blog builds on a server like this one.
If you would rather have your workflows built and hosted for you than maintain this server yourself, we can scope it on a short call. Book a call with GenovaFlow AI
What it costs: the VM is free, the public IP address is not
Google's Free Tier page gives every billing account one non preemptible e2-micro VM a month in Oregon (us-west1), Iowa (us-central1) or South Carolina (us-east1), 30 GB months of standard persistent disk and 1 GB of outbound data transfer from North America. The allowance is counted in hours across all your e2-micro VMs, so one VM running all month is exactly the free amount and a second one is billed.
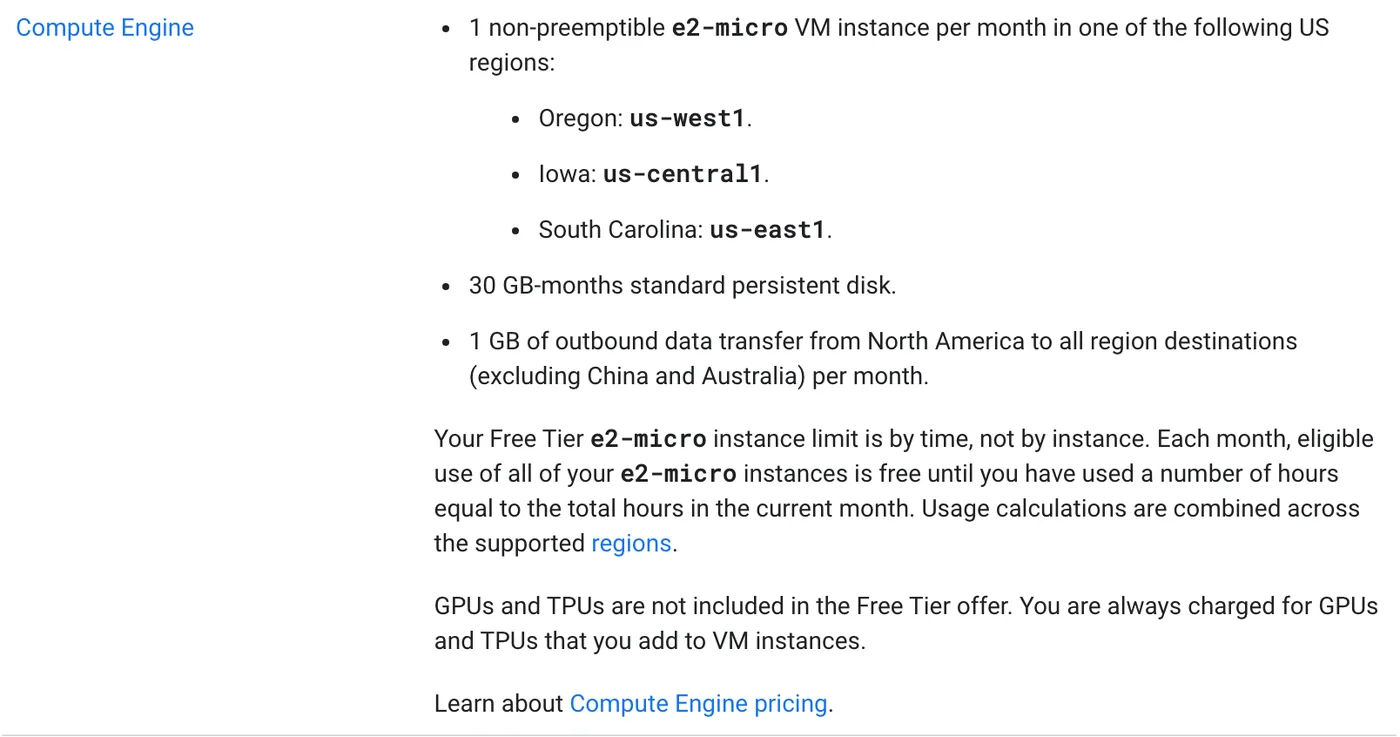
An e2-micro is small. Google's machine type table lists it with 2 vCPUs that share 25% of one core between them and 1 GB of memory, with short bursts to full speed. That memory is why this guide runs a single n8n container instead of n8n's newer one line installer, which also starts sandbox and search services for n8n Assistant next to n8n.
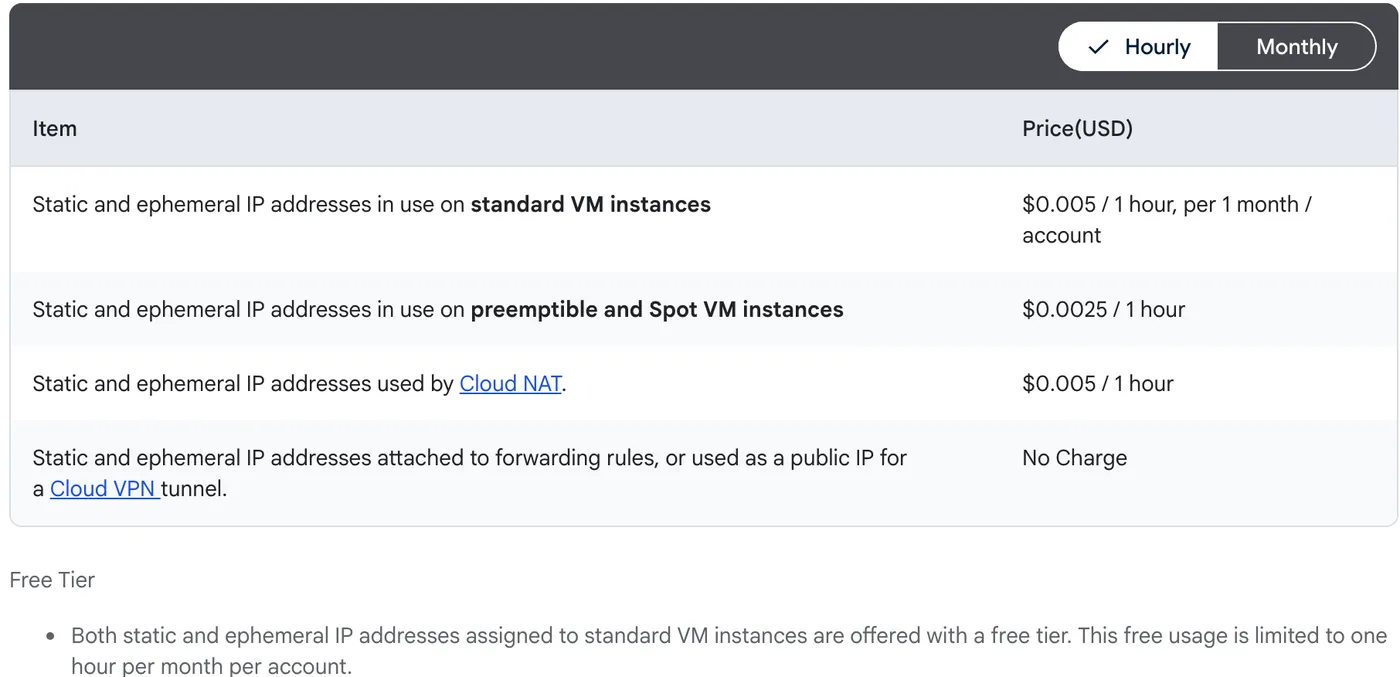
The cost the original guide missed is the external IPv4 address. Google's network pricing page charges $0.005 an hour for a static or ephemeral IP in use on a standard VM, and the free tier for it is one hour a month per account. For a 730 hour month that is about $3.65. Open Billing reports after your first week to see what your own account is charged.
The Free Tier needs a billing account, and a new account usually starts as a Free Trial with $300 of credit for 90 days, according to the same Free Tier page. When the trial ends without an upgrade to a paid account, billing is disabled and your VM stops, with 30 days to upgrade before trial resources are deleted. Upgrade before day 90 and the Free Tier carries on.
Step 1: create an e2-micro VM in a free region
In the Google Cloud console, create a project (the video names it after n8n), link your billing account to it under Billing, then open Compute Engine, VM instances and press Enable. Then create the instance with these settings, which match the Free Tier list above:
- Region
us-central1(Iowa),us-west1orus-east1. Any other region is billed. - Series E2, machine type
e2-micro. - Under OS and storage, keep the Debian image and set the boot disk to Standard persistent disk at 30 GB. Only standard persistent disk is in the Free Tier, and in the video the default was a 10 GB disk of another type.
- Under Networking, tick Allow HTTP traffic and Allow HTTPS traffic, which Google's docs say open ports 80 and 443. Certbot needs 80 and your browser needs 443.
Next, make the IP address permanent. Google releases an ephemeral external IP whenever the VM is stopped, and a new one arrives on start, which would silently break your DNS record. Promote it to a static address, as Google's reservation docs describe:
- Open VPC network, IP addresses, then External IP addresses.
- On the VM's address, open the three dot menu and choose Promote to static IP address.
- Give it a name and press Reserve. Write the address down for the DNS step.
A static address in use costs the same hourly rate as the ephemeral one you already pay for, so this changes nothing on the bill. Finally, press SSH next to the VM in the console and authorise the browser terminal. Every command from here on runs in that terminal.
Step 2: install Docker from Docker's own repository
The first version of this guide installed docker.io, the package Debian builds itself. Docker's Debian install docs list docker.io among the unofficial packages to remove and install Docker Engine from Docker's apt repository instead, on Debian 13 and Debian 12. Set up the repository:
sudo apt update
sudo apt install ca-certificates curl
sudo install -m 0755 -d /etc/apt/keyrings
sudo curl -fsSL https://download.docker.com/linux/debian/gpg -o /etc/apt/keyrings/docker.asc
sudo chmod a+r /etc/apt/keyrings/docker.asc
sudo tee /etc/apt/sources.list.d/docker.sources <<EOF
Types: deb
URIs: https://download.docker.com/linux/debian
Suites: $(. /etc/os-release && echo "$VERSION_CODENAME")
Components: stable
Architectures: $(dpkg --print-architecture)
Signed-By: /etc/apt/keyrings/docker.asc
EOF
sudo apt update
Then install the engine and check that it runs a container. Docker notes that the service starts by itself on Debian, so the old systemctl start and enable lines are no longer needed:
sudo apt install docker-ce docker-ce-cli containerd.io docker-buildx-plugin docker-compose-plugin
sudo docker run hello-world
Keep sudo in front of every docker command in this guide. Adding your user to the docker group removes the need for it, but Docker's own post install page warns that the group grants root level privileges.
Step 3: point a subdomain at the VM
n8n needs a name before Certbot can issue a certificate for it. At your DNS provider, add an A record for a subdomain such as n8n with the VM's static IP as its value. The video uses Cloudflare, where a domain costs between 5 and 15 dollars a year, but any registrar works.
On Cloudflare, set the record's proxy status to DNS only before you save it. Cloudflare's proxy status docs explain that a DNS only record resolves to your server's own IP, while a proxied one resolves to Cloudflare's addresses, and this setup expects the browser and Let's Encrypt to reach the VM directly. Wherever this guide says n8n.example.com, use your own subdomain.
Step 4: run n8n in Docker with a named volume
n8n's Docker instructions create a named Docker volume and mount it at /home/node/.n8n, the folder where n8n keeps its SQLite database, its settings and the key that encrypts your credentials. This command follows that page and adds the settings for running behind Nginx. Replace the subdomain in three places and the timezone in two:
sudo docker volume create n8n_data

sudo docker run -d --restart unless-stopped \
  --name n8n \
  -p 127.0.0.1:5678:5678 \
  -e N8N_HOST="n8n.example.com" \
  -e N8N_PORT=5678 \
  -e N8N_PROTOCOL=https \
  -e N8N_WEBHOOK_URL="https://n8n.example.com/" \
  -e N8N_PROXY_HOPS=1 \
  -e GENERIC_TIMEZONE="Asia/Dubai" \
  -e TZ="Asia/Dubai" \
  -e N8N_ENFORCE_SETTINGS_FILE_PERMISSIONS=true \
  -v n8n_data:/home/node/.n8n \
  n8nio/n8n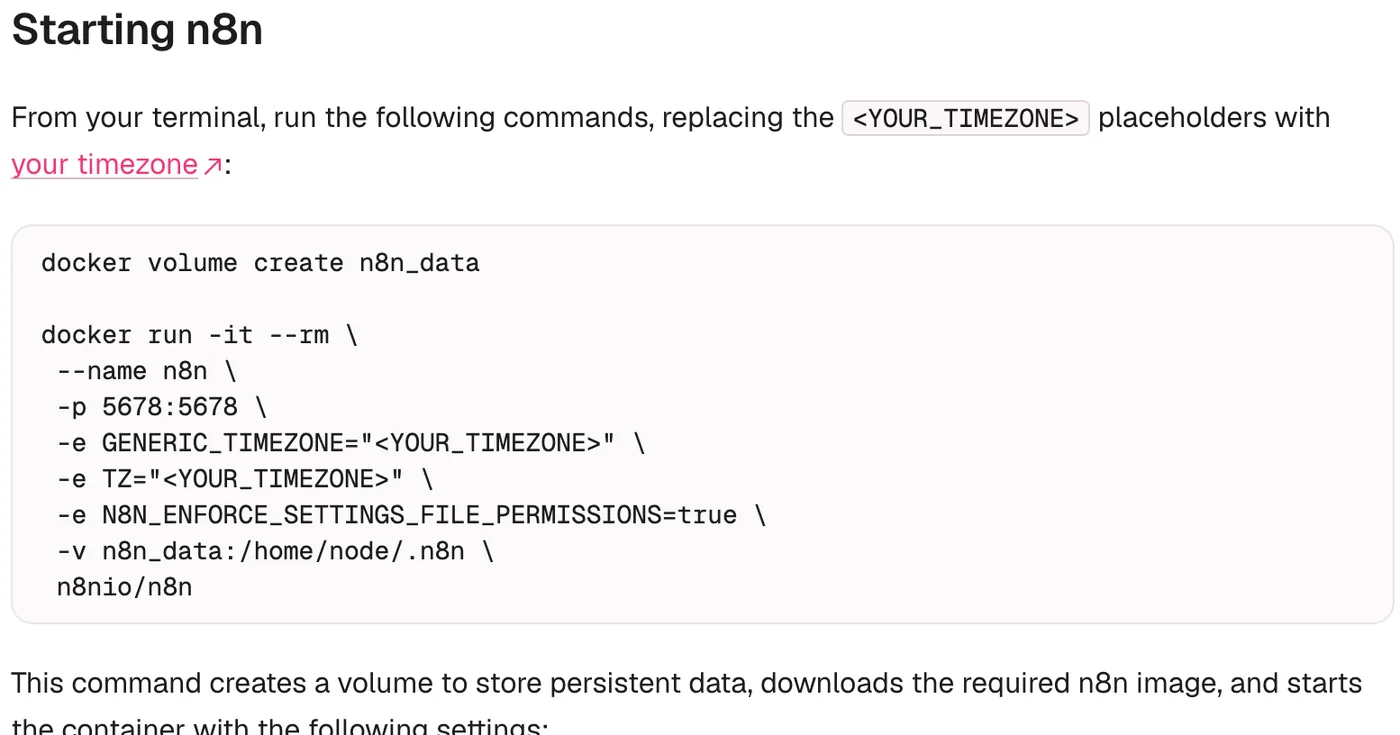
/home/node/.n8n.Here is what each part does, so you can change it with confidence:
-v n8n_data:/home/node/.n8nkeeps every workflow and credential in the volume, so removing or replacing the container leaves them alone.-p 127.0.0.1:5678:5678publishes n8n on the VM's localhost only. Docker's port publishing docs explain that a published port is open to the outside world unless you bind it to 127.0.0.1.N8N_HOST,N8N_PORTandN8N_PROTOCOLtell n8n its public address, as in n8n's own Docker Compose example.N8N_WEBHOOK_URLandN8N_PROXY_HOPS=1are what n8n's reverse proxy page asks for, so webhook URLs show your HTTPS domain instead of localhost.GENERIC_TIMEZONEsets the timezone for the Schedule Trigger andTZsets it for the container. Use your own zone name.--restart unless-stoppedbrings n8n back after a reboot unless you stopped it yourself.
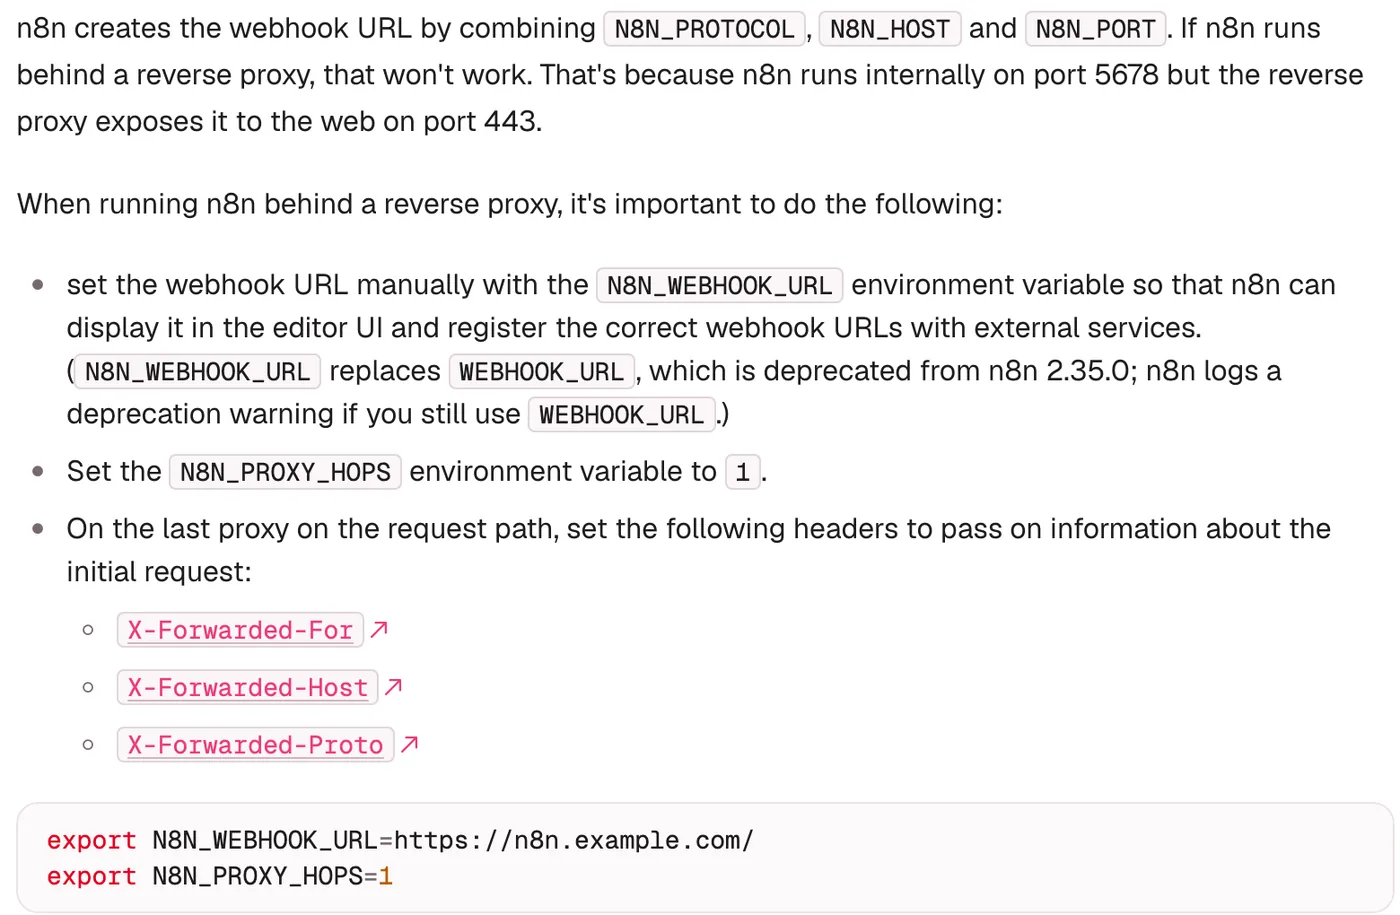
N8N_WEBHOOK_URL replaces WEBHOOK_URL from n8n 2.35.0.N8N_WEBHOOK_URL exists from n8n 2.30.0, per the Compose page, and WEBHOOK_URL still works with a deprecation warning, so on an older image keep the old name. Check that the container is up, and read its log if it is not:
sudo docker ps
sudo docker logs n8n
Step 5: put Nginx in front of n8n
Nginx receives the traffic on ports 80 and 443 and passes it to n8n on localhost, which also gives Certbot something to attach the certificate to. Install it and open a new site file:
sudo apt install nginx
sudo nano /etc/nginx/sites-available/n8n.conf
Paste this configuration and change the server_name line to your subdomain. The old version had a comment written with two slashes, which Nginx rejects, so comments here use #:
server {
    listen 80;
    server_name n8n.example.com;   # your domain or subdomain

    location / {
        proxy_pass http://127.0.0.1:5678;
        proxy_http_version 1.1;
        proxy_set_header Upgrade $http_upgrade;
        proxy_set_header Connection "upgrade";
        proxy_set_header Host $host;
        proxy_set_header X-Real-IP $remote_addr;
        proxy_set_header X-Forwarded-For $proxy_add_x_forwarded_for;
        proxy_set_header X-Forwarded-Host $host;
        proxy_set_header X-Forwarded-Proto $scheme;
        proxy_buffering off;
        proxy_cache off;
        chunked_transfer_encoding off;
        proxy_read_timeout 86400;
    }
}
The Upgrade and Connection headers let WebSocket connections through, which the n8n editor relies on; the Nginx WebSocket docs show the same pattern and note that an idle proxied connection closes after 60 seconds unless proxy_read_timeout is raised, here to a day. The three forwarded headers are the ones n8n's reverse proxy page lists, and the buffering lines are kept from the original config so responses pass straight through. Save with Ctrl+X, then Y and Enter.
Enable the site, test the configuration and reload Nginx:
sudo ln -s /etc/nginx/sites-available/n8n.conf /etc/nginx/sites-enabled/
sudo nginx -t
sudo systemctl reload nginx
If nginx -t says it could not build the server names hash
A long subdomain can stop Nginx with could not build server_names_hash, you should increase server_names_hash_bucket_size. The Nginx server names docs say to raise that value to the next power of two, and to raise server_names_hash_max_size only when the error names it. Open the main config, find the http block and set the line the video sets, removing the # in front of it:
sudo nano /etc/nginx/nginx.confserver_names_hash_bucket_size 128;
server_names_hash_max_size 2048; # only if the error mentions max_sizeRun sudo nginx -t again; it should report that the syntax is ok and the test is successful, and you can reload Nginx.
Step 6: add HTTPS with Certbot and Let's Encrypt
Certbot proves to Let's Encrypt that you control the domain by serving a token on port 80, the HTTP-01 challenge, so the A record must already point at the VM and HTTP traffic must be allowed. Certbot's own Nginx instructions strongly recommend the snap over Debian's package. Install snapd first, following the snapd guide for Debian, then log out of the SSH window and back in so the snap paths load:
sudo apt update
sudo apt install snapd
sudo snap install snapd
Then install Certbot, link the command and request the certificate for your subdomain. Certbot asks for an email address for renewal notices and edits the Nginx site for you:
sudo snap install --classic certbot
sudo ln -s /snap/bin/certbot /usr/local/bin/certbot
sudo certbot --nginx -d n8n.example.com
sudo certbot renew --dry-run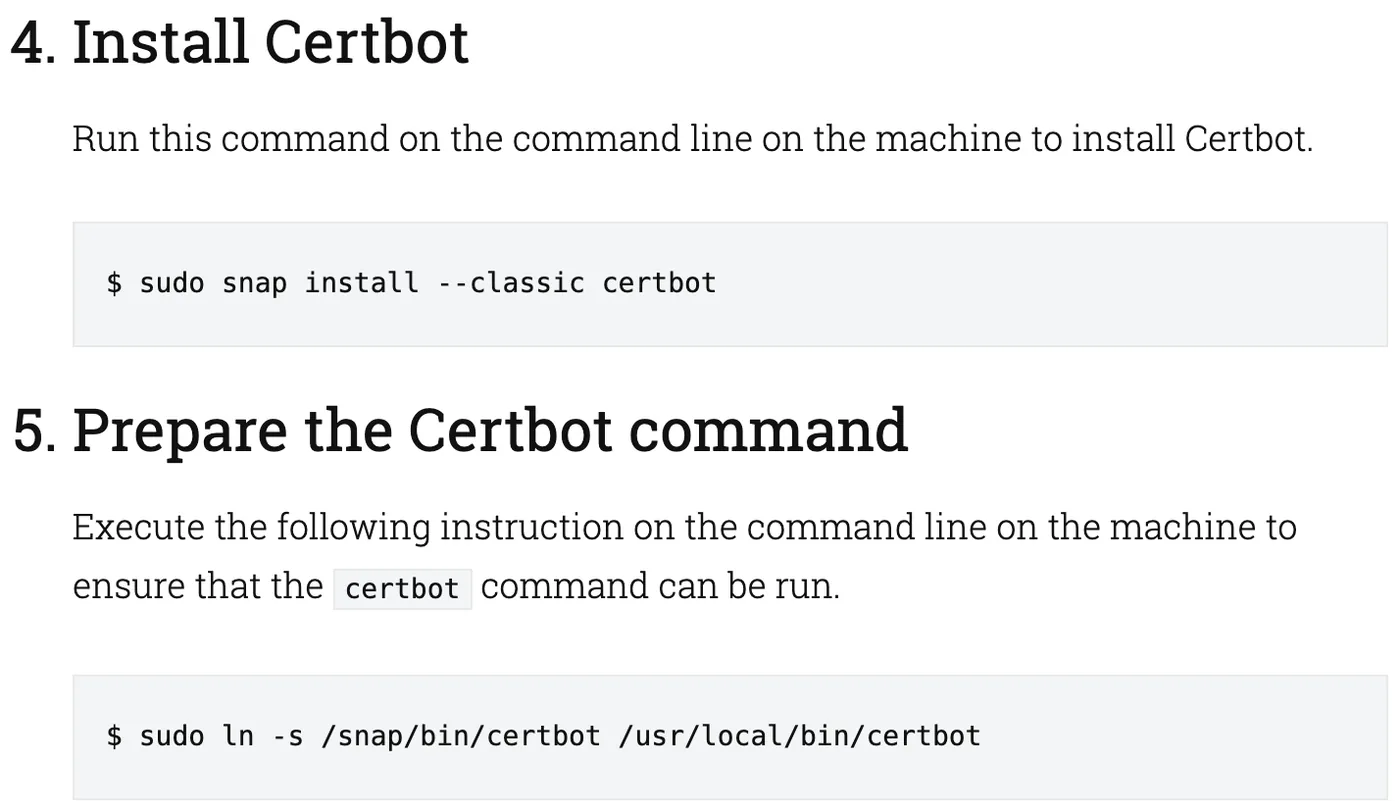
The last line tests automatic renewal, which the snap sets up by itself. If you installed Certbot with apt from the old version of this guide, Certbot asks you to remove that package with sudo apt-get remove certbot before installing the snap, so the right binary runs.
Now open https://n8n.example.com. n8n shows its owner setup screen: enter your email, name and a password, and that account becomes the owner of the instance. The same HTTPS address is what the Gemini voice agent for Telegram needs, because Telegram only delivers to an HTTPS webhook, and it is the base for the YouTube cross posting workflow too.
Used the 2025 version? Move your data before you update
The earlier command mounted ~/.n8n at /root/.n8n, but the n8n image runs as the node user and stores everything in /home/node/.n8n, as its Dockerfile and n8n's Docker page both show. Your workflows therefore live inside the container and not on the VM's disk. They survive restarts, but docker rm deletes them, and the old update steps ran exactly that.
Copy the folder out of the old container, put it in a named volume and fix its owner. docker cp works on a stopped container, and the docker cp docs note that copied files belong to root, which is why the last command hands them back to node:
sudo docker stop n8n
sudo docker cp n8n:/home/node/.n8n ./n8n-rescue
sudo docker volume create n8n_data
sudo docker run --rm -u root --entrypoint sh \
  -v n8n_data:/home/node/.n8n -v "$PWD/n8n-rescue":/rescue \
  n8nio/n8n -c 'cp -a /rescue/. /home/node/.n8n/ && chown -R node:node /home/node/.n8n'
sudo docker rename n8n n8n-old
Now start the new container with the Step 4 command and log in with your existing owner account. If your Nginx site still says proxy_pass http://localhost:5678, change it to http://127.0.0.1:5678 to match the new port binding and reload Nginx. Because the whole folder moved, including the encryption key and the SQLite database, the backup docs count this as a full instance restore and your credentials still decrypt. Once your workflows are all there, remove the old container and the copy:
sudo docker rm n8n-old
rm -rf ./n8n-rescue
Keep it updated and backed up
n8n's update guide advises updating at least once a month, reading the release notes for breaking changes first, and taking a full backup before every update. With SQLite, a full backup is the .n8n folder, and the backup docs say to stop n8n before copying it so the database file is consistent.
Back up the volume
This stops n8n for a few seconds, writes the volume to a dated archive in your home folder with a throwaway container, the pattern from Docker's volume docs, and starts n8n again:
sudo docker stop n8n
sudo docker run --rm -v n8n_data:/data -v "$HOME":/backup debian \
  tar czf /backup/n8n-backup-$(date +%F).tar.gz -C /data .
sudo docker start n8n
Copy the archive off the VM afterwards, because a backup that sits on the same disk disappears with it. For readable copies of individual workflows and credentials, the n8n CLI exports them as JSON files into the volume:
sudo docker exec -u node n8n n8n export:workflow --backup --output=/home/node/.n8n/backups/workflows/
sudo docker exec -u node n8n n8n export:credentials --backup --output=/home/node/.n8n/backups/credentials/
Those exports leave out users, execution history, variables and the encryption key, and credentials stay encrypted with that key, so keep the volume archive as your real backup.
Update n8n
Updating means pulling the new image and recreating the container from it. The volume is untouched, so your data carries over:
sudo docker pull n8nio/n8n
sudo docker stop n8n
sudo docker rm n8n
sudo docker run -d --restart unless-stopped \
  --name n8n \
  -p 127.0.0.1:5678:5678 \
  -e N8N_HOST="n8n.example.com" \
  -e N8N_PORT=5678 \
  -e N8N_PROTOCOL=https \
  -e N8N_WEBHOOK_URL="https://n8n.example.com/" \
  -e N8N_PROXY_HOPS=1 \
  -e GENERIC_TIMEZONE="Asia/Dubai" \
  -e TZ="Asia/Dubai" \
  -e N8N_ENFORCE_SETTINGS_FILE_PERMISSIONS=true \
  -v n8n_data:/home/node/.n8n \
  n8nio/n8n
Update Docker and the VM
Docker Engine now updates with the rest of the system from Docker's repository. If the upgrade restarts Docker, the restart policy brings n8n back with it:
sudo apt update
sudo apt upgrade
Fixes for the errors people hit most
permission denied while trying to connect to the Docker daemon socket
The command ran without sudo. The old update steps left it out. Put sudo back in front, or join the docker group knowing it is root level access.
Certbot cannot verify the domain
Let's Encrypt fetches a file from http:// your domain, so check three things in order: the A record points at the VM's current IP, the record is DNS only on Cloudflare, and Allow HTTP traffic is ticked on the VM. Then run the Certbot command again.
n8n says it is configured to use a secure cookie
You opened n8n over plain HTTP. N8N_SECURE_COOKIE is true by default and, in n8n's security settings, sends the login cookie over HTTPS only. Finish the Certbot step and use the https:// address; turning the setting off on a public server would send your session in the clear.
Webhook URLs show localhost:5678
N8N_WEBHOOK_URL is missing or wrong. Recreate the container with the Step 4 command. Telegram triggers fail with "An HTTPS URL must be provided for webhook" for the same reason, according to n8n's Telegram trigger issues page.
The editor keeps losing its connection, or a trigger never stops listening
WebSocket traffic is not getting through the proxy. Check that the Upgrade and Connection lines are in the Nginx site and reload it.
502 Bad Gateway
Nginx is up but n8n is not answering on port 5678. Run sudo docker ps to see whether the container is running and sudo docker logs n8n to see why it stopped.
The site went down after the VM was restarted
The VM came back with a new ephemeral IP and DNS still points at the old one. Promote the address to static as in Step 1 and update the A record once.
If you would rather not run a server at all, the custom AI agents page explains how GenovaFlow builds automations like this for clients.
Questions people ask
Is n8n free on Google Cloud?
The n8n Community Edition costs nothing and the e2-micro VM, 30 GB standard disk and 1 GB of monthly outbound traffic are in Google Cloud's Free Tier. The VM's external IPv4 address is billed separately at $0.005 an hour on the network pricing page, about $3.65 a month, and you need a domain for HTTPS.
Can you host n8n on Google Cloud Run instead of a VM?
Yes, n8n documents it, with a catch. In its Cloud Run guide, the quick easy mode keeps data in memory and loses it whenever the service scales to zero or is redeployed. The durable mode adds a Cloud SQL database and Secret Manager, which are separate paid services, so a small VM is the simpler free option.
How do you update n8n in Docker without losing data?
Back up the volume, then pull the new image, stop and remove the container, and start it again with the same docker run command and the same named volume. The data lives in the volume, not the container, so it carries over. This only holds if the volume is mounted at /home/node/.n8n, as n8n's Docker page shows.
Should you turn off the n8n secure cookie setting?
Not on a server that is reachable from the internet. The secure cookie setting makes n8n send its login cookie over HTTPS only, per the security settings. The error that tempts people to turn it off means they opened n8n over plain HTTP, and the fix is to finish the Certbot step and use the HTTPS address.
Which Google Cloud region is free for n8n?
Only Oregon (us-west1), Iowa (us-central1) and South Carolina (us-east1) qualify for the free e2-micro, according to the Free Tier page. A VM anywhere else, a different machine type or a balanced disk is billed at normal rates. The video uses Iowa.
Sources
- Free Tier usage limits, Google Cloud
- Network pricing: external IP addresses, Google Cloud
- General purpose machine family (E2 shared core), Google Cloud
- Reserve a static external IP address, Google Cloud
- Install Docker Engine on Debian, Docker
- Port publishing and mapping, Docker
- docker container cp, Docker
- Install with Docker, n8n Docs
- Configure webhook URLs with reverse proxy, n8n Docs
- Use Docker Compose, n8n Docs
- Back up and restore, n8n Docs
- 1.0 migration checklist, n8n Docs
- n8n Docker image Dockerfile, n8n on GitHub
- WebSocket proxying, nginx.org
- Server names, nginx.org
- Certbot instructions for Nginx (snap), EFF
- Challenge types, Let's Encrypt
- Proxy status, Cloudflare DNS docs
Keep reading
Build a Gemini Voice Agent for Telegram in n8n
An n8n Telegram bot that transcribes voice notes with Gemini, answers with Gmail and Sheets tools and replies by voice, updated for current Gemini models.
Read the post
Turn one YouTube video into LinkedIn, X and Reddit posts with n8n
An n8n workflow that turns a YouTube video into LinkedIn, X, Reddit and blog posts, with a Telegram approval step before anything publishes.
Read the post
n8n vs Zapier vs Make for AI workflows, and where Claude Code fits
How n8n, Zapier and Make price AI workflows, what n8n's license lets you self host, and when a coded agent like Claude Code is the better tool.
Read the post